We finally got around to actually cooking in my healthy lifestyles class. It is interesting to note the significant difference in how Chef Kim organizes his labs vs. how Chef Joe does. Chef Joe is a very rigid authoritarian. He requires everyone to wait to do anything until he authorizes the specific action. He also allows only limited variation from his recipes for the session.
In contrast, Chef Kim gave us a pile of material, six techniques to demonstrate, and freedom to decide which vegetables to use for which techniques, how to cut the vegetables, and who was to do what. It was an interesting experience.
We were given some zucchini and yellow squash, carrots, tomatoes, and broccoli. We were to demonstrate six techniques: sauteing, stir frying, steaming, poaching, braising, and en papillote (in parchment). The other members of my team quickly claimed various methods, leaving sauteing and braising for me. I was the only one to do two techniques.
I thin sliced some carrots, yellow, and green squash for sauteing. I was happy that I was able to saute the vegetables just by flipping them in the pan. I did not use a spoon or spatula at all. I cooked the carrots for about a minute before adding the squash. It went quickly, as it should.
I then went back and thick cut some of each squash for braising, and cut up some chunks of tomato. I seasoned some water with salt and pepper. Once it was up to a simmer, I added the squash and covered the pan. I let it cook for a bit, then added the tomatoes. Once the squash was cooked, I removed it from the water.
I felt I did a good job. My team thought the braised veggies were the best, and the sauteed the second best. Chef liked both as well, and thought I had properly cut the vegetables for both. The only criticism was that I had been a tad aggressive with the pepper in the sauteed veggies, and I think that was a fair cop.
We also were to create two flavored vinegars and a flavored oil for doing salads next week. We made a red wine vinegar with blueberries and lemon, and a white wine vinegar with thyme and lemon. For the oil, we went with a classic, garlic and rosemary. Apparently so did all the other tables, independently.
Should be an interesting semester.
Showing posts with label Basics. Show all posts
Showing posts with label Basics. Show all posts
Saturday, March 1, 2014

Wednesday, April 17, 2013
Culinary Class: Roast Chicken with Roasted Root Vegetables, and Funnel Cake
 We are continuing our survey of dry cooking methods. For this class, we were exploring roasting. We made a marinade, halved some chickens, and cut up some vegetables. Probably our easiest prep yet.
The marinade was made up for us, so it had time for the flavors to blend. It had oil and vinegar, and was flavored with a variety of herbs, spices, and prepared mustard.
We cut up an onion, some celery, a sweet potato, carrots, and a beet. We tossed them with the marinade, and roasted them
in the oven. They were quite good.
We cut some chickens in half, and tossed them with the same marinade. We roasted them until the skin was crispy, and the meat juicy and tender.

To keep busy while everything was roasting, we made funnel cakes. That was fun, I've never done that before. We did not get to make the batter ourselves, it needed to sit for a bit. The batter was placed in squeeze bottles, for easy of piping.
We pan fried them in a skillet half full of oil. One touch I liked, we used heart shaped cookie cutters to contain and shape the funnel cakes. We piped the batter into the outline of the cutter, then removed the cutter as the funnel cake set. Once browned on the bottom, we flipped them over to finish.

It came out very light and tender, but crisp on the outside.
As always, all recipes courtesy chef Joe Orate.
Recipes
Chef Joe's Spiced Oil for Roasting
2 cups salad oil1/4 cup white vinegar
1 Tbsp. dried oregano
1 Tbsp. dried parsley
1 Tbsp. dried thyme
1 Tbsp. granulated garlic
1 Tbsp. prepared yellow mustard
1/2 Tbsp. curry powder
1/2 Tbsp. paprika
1/2 Tbsp. dried basil
1/2 Tbsp. black pepper
1/2 Tbsp. salt
Blend together all ingredients.
Chef Joe's Funnel Cake
2 eggs1 1/2 cups milk
2 1/2 cups flour
4 Tbsp. sugar
2 tsp. baking soda
1 tsp. baking powder
1/2 tsp. salt
oil for frying
powdered sugar for garnish
Mix together all ingredients, place in a squeeze bottle.
Place 1/2 to 3/4 inch oil in a heavy skillet. Heat oil to between 350 F and 375 F. Place a metal ring in pan. Pipe batter into ring. When dough is set, remove ring. When brown , flip and allow to cook on the other side. When brown on both sides, remove from oil. Sprinkle with powdered sugar.
Happy eating!
Thursday, March 21, 2013
Culinary Class: Pan Fried Chicken
In this class we covered another dry cooking method, pan frying. The difference between pan frying and sauteing is the depth of the oil. In sauteing, there was just enough oil to prevent the food from sticking to the pan. In pan frying, the oil should be deep enough to come half way up the food in the pan. It uses the heat of the oil to cook the food.
 We made pan fried boneless chicken, using the leg and thigh. We pounded the pieces thin, and then breaded in a similar three stage process to that we used the week before. The chicken pieces were dipped in seasoned flour, then buttermilk, then seasoned bread crumbs.
Pan fried foods, just like sauteed ones, should only be turned once. It is important to carefully regulate the heat. Too hot, and the outside burns before the inside is cooked. Too cool, and you end up with pale, greasy food.
We had an Asian style dipping sauce to go with it. It was really good. It had a lot going on. Somewhat sweet, somewhat tangy, with a fair amount of heat.
 We also fried up some squash sticks and onion rings. Those were battered in the same three step process. We used seasoned flour, egg, and panko bread crumbs. Panko crumbs differ in that they are courser, and lighter, than regular bread crumbs. This results in a lighter, crispier texture. The squash came out really good. I think we didn't have the heat high enough for our onion rings. They were a little greasy, and we had a hard time keeping the breading on them.
All in all, not bad. Hard to go wrong with fried chicken, though.
Dipping sauce recipe courtesy of Chef Joe Orate.
3 fl. oz. BBQ sauce
3 fl. oz. sweet chili sauce
2 fl. oz. white vinegar
2 cloves garlic, minced
1/4 cup minced onion
sambal to taste
Tobasco or other hot sauce to taste

Pan fried foods, just like sauteed ones, should only be turned once. It is important to carefully regulate the heat. Too hot, and the outside burns before the inside is cooked. Too cool, and you end up with pale, greasy food.
We had an Asian style dipping sauce to go with it. It was really good. It had a lot going on. Somewhat sweet, somewhat tangy, with a fair amount of heat.

All in all, not bad. Hard to go wrong with fried chicken, though.
Dipping sauce recipe courtesy of Chef Joe Orate.
Chef Joe's Asian BBQ Dipping Sauce
3 fl. oz. ketchup3 fl. oz. BBQ sauce
3 fl. oz. sweet chili sauce
2 fl. oz. white vinegar
2 cloves garlic, minced
1/4 cup minced onion
sambal to taste
Tobasco or other hot sauce to taste
Wednesday, March 13, 2013
Culinary Class: Sauteed Chicken Breast and Vegetables
In my culinary class, we are starting to work our way through the dry cooking methods. Last week was grilling, this week was sauteing. Saute comes from the French for 'jump', referring to the tossing of the food often done with this technique. Sauteing involves frying items over direct heat in just a little fat. With small items, the cook will often jerk the pan in rhythmic pattern to cause the pieces to jump out of, and back into the pan.
We started the class by doing the prep work for some other class, dicing a lot of carrots, parsnips, rutabagas, tomatoes, onions, and parsley. This was to practice our knife skills. As a computer geek, I immediately thought of it as distributed processing.
We then cut up the vegetables for our side dish. Onion, carrot, celery, two kinds of squash
 After that, we broke down the chickens that we are using this week, and next. We saved the leg quarters for next week, and used the boneless, skinless breasts, and tenderloins this week. We sliced the breasts into pieces the same size as the tenderloins, and pounded them all flat between two pieces of plastic wrap.
We then breaded the chicken in the classic method. That involves dredging the chicken pieces in seasoned flour, then in egg, then again in seasoned flour.
We cooked the chicken in a little oil in a very hot pan. They cooked rapidly, about one minute per side. We then made a wine sauce to go with. After the chicken was removed, we drained the excess oil, then added garlic and onion to the pan. We cooked that for just a minute, then de-glaze the pan with a little white wine. We added some chicken stock, then let it come to a boil. We let it reduce a little, We then added some minced parsley, and returned the chicken to the pan. We let that cook a minute to re-warm the chicken.
I liked this. The chicken was very tender. The wine sauce complimented the chicken very well.
 We also sauteed the vegetables. The mirepoix (carrots, celery, and onions) was cooked first, then the squash. They were finished with a little parsley. They came out very nice, tender but not mushy.
Still working on real basic stuff, but at least the pace is picking up. We were kept moving until almost ten.
Wine sauce recipe courtesy of Chef Joe Orate.
1 Tbsp. minced garlic
3 oz by vol. white wine
1 pint chicken stock
4 oz by wt. butter, softened
1/2 cup minced parsley.
When finished sauteing meat, drain excess oil. Add onion and garlic to pan. Cook about one minute. Add wine to de-glaze the pan. Add stock. Bring back to a boil. Let reduce for a couple of minutes. Add butter, allow to melt. Add parsley. Cook briefly, then remove from heat and serve.
Happy eating!
We started the class by doing the prep work for some other class, dicing a lot of carrots, parsnips, rutabagas, tomatoes, onions, and parsley. This was to practice our knife skills. As a computer geek, I immediately thought of it as distributed processing.
We then cut up the vegetables for our side dish. Onion, carrot, celery, two kinds of squash
 After that, we broke down the chickens that we are using this week, and next. We saved the leg quarters for next week, and used the boneless, skinless breasts, and tenderloins this week. We sliced the breasts into pieces the same size as the tenderloins, and pounded them all flat between two pieces of plastic wrap.
We then breaded the chicken in the classic method. That involves dredging the chicken pieces in seasoned flour, then in egg, then again in seasoned flour.
We cooked the chicken in a little oil in a very hot pan. They cooked rapidly, about one minute per side. We then made a wine sauce to go with. After the chicken was removed, we drained the excess oil, then added garlic and onion to the pan. We cooked that for just a minute, then de-glaze the pan with a little white wine. We added some chicken stock, then let it come to a boil. We let it reduce a little, We then added some minced parsley, and returned the chicken to the pan. We let that cook a minute to re-warm the chicken.
I liked this. The chicken was very tender. The wine sauce complimented the chicken very well.

Still working on real basic stuff, but at least the pace is picking up. We were kept moving until almost ten.
Wine sauce recipe courtesy of Chef Joe Orate.
Chef Joe's White Wine Sauce
1/4 onion, minced1 Tbsp. minced garlic
3 oz by vol. white wine
1 pint chicken stock
4 oz by wt. butter, softened
1/2 cup minced parsley.
When finished sauteing meat, drain excess oil. Add onion and garlic to pan. Cook about one minute. Add wine to de-glaze the pan. Add stock. Bring back to a boil. Let reduce for a couple of minutes. Add butter, allow to melt. Add parsley. Cook briefly, then remove from heat and serve.
Happy eating!
Tuesday, February 26, 2013
Pastry Class: Puff Pastry and Pate a Choux
I was really excited about today's class. I've always been intrigued by the idea of making my own puff pastry. I'm glad to get the opportunity to understand laminated doughs. So far, it seems easier than expected. We'll find out for sure in a week, when we get to make things with the pastry.
Making puff pastry is more about patience. The pastry needs to be returned to the refrigerator between each step. The butter in the dough needs to be kept cold, so that it remains distinct from the dough.
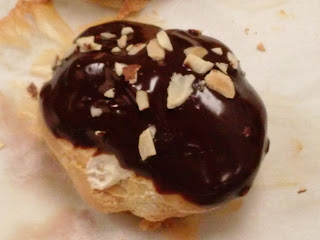 The other thing we learned to do is pate a choux. Pate a choux is a slightly sticky, fluid batter that can be piped, and is used to make cream puffs, eclairs, crullers, beignets, and other things. We used it to make cream puffs, with a mocha whipped cream filling, and dipped in a dark chocolate ganache.
Both recipes are easier than I expected, though both require patience and attention to detail.
As always for the pastry class, are recipes are courtesy of Chef James Foran.
16 oz by wt. bread flour
3/10 oz by wt. salt
2 1/2 oz by wt. butter, melted and cooled to room temperature
8 oz by vol. cold water
Roll the 9 1/2 oz butter between two sheets of parchment paper into a 8" by 14" rectangle. Refrigerate for at least 30 minutes.
In a stand mixer with a paddle, combine flour and salt. Add water and melted butter all at once. Mix on low speed 8 to 10 revolutions until dough is just combined. Do not over mix.
Knead just until combined. Wrap in plastic wrap, refrigerate for 30 minutes.
Roll dough on a floured surface into a 10" by 20" rectangle. Place chilled butter sheet on bottom 2/3 of the dough. Fold top 1/3 of dough down to cover half the butter. Fold bottom third of dough up, sot that butter is now enclosed in dough.
Roll dough into a 10" by 22" rectangle. Along long axis, fold both ends of dough into the middle, then fold in half to form four layers. Cover and chill for at least 30 minutes.
Repeat three more times. Wrap dough thoroughly, and freeze.
4 oz by vol. milk
4 oz by wt. butter
1/2 tsp. salt
6 oz by wt. bread flour
9 oz by wt. eggs
In a saucepan over medium heat, combine water, milk, and butter. Bring just to a boil. Add flour and salt all at once. Cook for one minute, stirring with a wooden spoon, over medium-low heat. Batter will turn into a ball almost immediately.
Remove from heat, transfer dough to the bowl of a stand mixer. Process with a paddle on low speed for 30 seconds to cool. Add eggs in four stages. At each stage, blend at high speed. Batter should be a shiny, thick paste.
To make cream puffs:
Place pate a choux in a pastry bag with a large round tip. While still warm, pipe onto a parchment lined sheet pan. Pipe quarter sized rounds of dough. Leave space for expansion between rounds.
Bake in a 375 F oven for 20 minutes. Reduce oven temperature to 350 F, and prop door of oven slightly open to allow venting. Bake another 10 minutes.
Remove from oven, and allow to cool completely.
When cool, pipe filling into shells. Dip into ganache. Sprinkle with chopped almonds. Refrigerate to allow chocolate to harden.
5 Tbsp. powdered sugar
1 tsp. mocha concentrate
pinch salt
Combine all ingredients in the bowl of a stand mixer with a whisk. Whip to medium stiff peaks.
6 oz by weight chocolate
Heat cream to just boiling. Pour over chocolate. Let stand for a couple of minutes. Whisk together chocolate and cream.
Happy Eating!
Making puff pastry is more about patience. The pastry needs to be returned to the refrigerator between each step. The butter in the dough needs to be kept cold, so that it remains distinct from the dough.

Both recipes are easier than I expected, though both require patience and attention to detail.
As always for the pastry class, are recipes are courtesy of Chef James Foran.
Recipes
Classic Puff Pastry
9 1/2 oz by wt. butter at room temperature16 oz by wt. bread flour
3/10 oz by wt. salt
2 1/2 oz by wt. butter, melted and cooled to room temperature
8 oz by vol. cold water
Roll the 9 1/2 oz butter between two sheets of parchment paper into a 8" by 14" rectangle. Refrigerate for at least 30 minutes.
In a stand mixer with a paddle, combine flour and salt. Add water and melted butter all at once. Mix on low speed 8 to 10 revolutions until dough is just combined. Do not over mix.
Knead just until combined. Wrap in plastic wrap, refrigerate for 30 minutes.
Roll dough on a floured surface into a 10" by 20" rectangle. Place chilled butter sheet on bottom 2/3 of the dough. Fold top 1/3 of dough down to cover half the butter. Fold bottom third of dough up, sot that butter is now enclosed in dough.
Roll dough into a 10" by 22" rectangle. Along long axis, fold both ends of dough into the middle, then fold in half to form four layers. Cover and chill for at least 30 minutes.
Repeat three more times. Wrap dough thoroughly, and freeze.
Pate a Choux
4 oz by vol. water4 oz by vol. milk
4 oz by wt. butter
1/2 tsp. salt
6 oz by wt. bread flour
9 oz by wt. eggs
In a saucepan over medium heat, combine water, milk, and butter. Bring just to a boil. Add flour and salt all at once. Cook for one minute, stirring with a wooden spoon, over medium-low heat. Batter will turn into a ball almost immediately.
Remove from heat, transfer dough to the bowl of a stand mixer. Process with a paddle on low speed for 30 seconds to cool. Add eggs in four stages. At each stage, blend at high speed. Batter should be a shiny, thick paste.
To make cream puffs:
Place pate a choux in a pastry bag with a large round tip. While still warm, pipe onto a parchment lined sheet pan. Pipe quarter sized rounds of dough. Leave space for expansion between rounds.
Bake in a 375 F oven for 20 minutes. Reduce oven temperature to 350 F, and prop door of oven slightly open to allow venting. Bake another 10 minutes.
Remove from oven, and allow to cool completely.
When cool, pipe filling into shells. Dip into ganache. Sprinkle with chopped almonds. Refrigerate to allow chocolate to harden.
Mocha Whipped Cream Filling
20 oz. by wt. cream5 Tbsp. powdered sugar
1 tsp. mocha concentrate
pinch salt
Combine all ingredients in the bowl of a stand mixer with a whisk. Whip to medium stiff peaks.
Chocolate Ganache
6 oz by vol. cream6 oz by weight chocolate
Heat cream to just boiling. Pour over chocolate. Let stand for a couple of minutes. Whisk together chocolate and cream.
Happy Eating!
Friday, February 22, 2013
Pastry Class: Pizza and Dinner Rolls
In my most recent pastry class, we made our first excursion into the world of yeast breads. Up to now, we've only done products using chemical and mechanical leaveners.
Yeast is a wonderful micro-organism that consumes sugars, and releases carbon dioxide and alcohol as waste products. When brewing, we keep want to keep the alcohol and release (mostly) the CO2 .In baking, we keep the CO2 to lighten the product, and cook out the alcohol.
The thing that makes yeast breads work is a protein called gluten. Of all the grains, wheat has the highest concentration of gluten, so are by far the best for raised breads. Gluten is elastic, and can cross-link between molecules to form a web.
Up to now, we have done our best to avoid developing the gluten in bread. In cakes, pie crust, or scones, we want a soft, tender texture. For raised breads, we want the chewy texture, so want to develop the gluten.
The process to develop the gluten is called 'kneading'. It can be done by hand, or by various machines, like a bread machine, a mixer with a dough hook, or a food processor. When done by hand, the procedure involves repeatedly pressing, stretching, and folding the dough. This can take up to ten minutes. I love the moment when you can feel it go from a slightly lumpy and reluctant mass, to a smooth and fluid dough. One way to check to see if the dough has been kneaded enough is called 'the windowpane test'. To do this, cut off a small bit of the dough, and gently stretch it. If you can stretch it to a thin enough membrane to see through, the dough is ready.
At this point the dough needs to sit and allow the yeast to do their thing. If everything is working the way it is suppose to, the yeast will inflate the dough to double it's original size. This is best done in a warm, moist environment. Commercial kitchens frequently have proofing cabinets, boxes that allow for precise control of temperature and humidity. At home this can be done in an oven which is turned off. Place a bowl of hot water in the oven with the bread to provide heat and moisture.
Once the dough has doubled in size, it needs to be 'punched down'. This just involves letting the trapped gas bubbles escape. At this point, the dough can be divided into the appropriate portions. The dough should be cut, not torn. Let the dough rest, covered, for a few minutes, then shape as desired.
The bread is then allowed to rise a second time. Once it doubles in size, it gets baked.
 For our first foray into yeast breads, we made pizza and dinner rolls. The pizza dough was shaped into two approximately eighteen inch diameter rounds. We were provided with various toppings, which included tomato sauce, cheese, cooked sausage, mushrooms, black olives, and fresh basil. Once assembled, the pizza was baked in a screaming hot oven. Our oven was set to 600 F. If you have a pizza stone to cook on, that will make the crispest crust. You can, however, use a well greased sheet pan.
 We made three shapes of rolls; round, knotted, and cloverleaf. These were given an egg wash, and baked in a moderate oven. As always for the pastry class, all recipes provided by Chef James Foran.
13 1/2 oz by wt. bread flour
1 1/2 tsp. instant dry yeast
Wet Ingredients
8 1/2 oz by vol. water (at 110 F)
2 Tbsp. olive oil
2 tsp. salt
Dissolve yeast in water, let stand five minutes. Stir together yeast mixture, flour, and olive oil. When combined, mix in salt. Knead 5 to 8 minutes, until smooth, and passes the window pane test. Place in a lightly oiled bowl. Cover, let rise until double in size, approximately 45 minutes. Punch down, divide into two equal pieces.Cover, let rest 10 minutes. Shape into flat rounds. Use cornmeal to prevent dough sticking to stone or pan. Add sauce and desired toppings. Bake in a 550 F oven until brown and cheese is melted.
2 1/2 lbs by bread flour
4 oz by wt. sugar
3/4 oz by wt. yeast
3/4 oz by wt. salt
Wet Ingredients
20 oz by vol milk(at 110 F)
4 oz by wt. butter melted, at room temperature.
4 oz by wt. eggs
Egg Wash Ingredients
1 egg
2 Tbsp. water
pinch salt
Dissolve yeast in milk, let stand 5 minutes. Mix together all wet ingredients. Sift together all dry ingredients except salt. Add wet ingredients to dry all at once. Once all are combined, stir in salt. Knead 5 to 8 minutes, until smooth, and passes the window pane test. Place in a lightly oiled bowl. Cover, let rise until double in size, approximately 45 minutes. Punch down, divide into 2 ounce pieces. Cover, let rest 10 minutes. Shape as desired, place on parchment covered cookie sheets. Cover, let rise until doubled in size. Brush with egg wash, bake in a 375 F oven until golden brown, approximately 15 - 20 minutes.
Happy eating!
Yeast is a wonderful micro-organism that consumes sugars, and releases carbon dioxide and alcohol as waste products. When brewing, we keep want to keep the alcohol and release (mostly) the CO
The thing that makes yeast breads work is a protein called gluten. Of all the grains, wheat has the highest concentration of gluten, so are by far the best for raised breads. Gluten is elastic, and can cross-link between molecules to form a web.
Up to now, we have done our best to avoid developing the gluten in bread. In cakes, pie crust, or scones, we want a soft, tender texture. For raised breads, we want the chewy texture, so want to develop the gluten.
The process to develop the gluten is called 'kneading'. It can be done by hand, or by various machines, like a bread machine, a mixer with a dough hook, or a food processor. When done by hand, the procedure involves repeatedly pressing, stretching, and folding the dough. This can take up to ten minutes. I love the moment when you can feel it go from a slightly lumpy and reluctant mass, to a smooth and fluid dough. One way to check to see if the dough has been kneaded enough is called 'the windowpane test'. To do this, cut off a small bit of the dough, and gently stretch it. If you can stretch it to a thin enough membrane to see through, the dough is ready.
At this point the dough needs to sit and allow the yeast to do their thing. If everything is working the way it is suppose to, the yeast will inflate the dough to double it's original size. This is best done in a warm, moist environment. Commercial kitchens frequently have proofing cabinets, boxes that allow for precise control of temperature and humidity. At home this can be done in an oven which is turned off. Place a bowl of hot water in the oven with the bread to provide heat and moisture.
Once the dough has doubled in size, it needs to be 'punched down'. This just involves letting the trapped gas bubbles escape. At this point, the dough can be divided into the appropriate portions. The dough should be cut, not torn. Let the dough rest, covered, for a few minutes, then shape as desired.
The bread is then allowed to rise a second time. Once it doubles in size, it gets baked.


Recipes
Pizza Dough
Dry Ingredients13 1/2 oz by wt. bread flour
1 1/2 tsp. instant dry yeast
Wet Ingredients
8 1/2 oz by vol. water (at 110 F)
2 Tbsp. olive oil
2 tsp. salt
Dissolve yeast in water, let stand five minutes. Stir together yeast mixture, flour, and olive oil. When combined, mix in salt. Knead 5 to 8 minutes, until smooth, and passes the window pane test. Place in a lightly oiled bowl. Cover, let rise until double in size, approximately 45 minutes. Punch down, divide into two equal pieces.Cover, let rest 10 minutes. Shape into flat rounds. Use cornmeal to prevent dough sticking to stone or pan. Add sauce and desired toppings. Bake in a 550 F oven until brown and cheese is melted.
Dinner Rolls
Dry Ingredients2 1/2 lbs by bread flour
4 oz by wt. sugar
3/4 oz by wt. yeast
3/4 oz by wt. salt
Wet Ingredients
20 oz by vol milk(at 110 F)
4 oz by wt. butter melted, at room temperature.
4 oz by wt. eggs
Egg Wash Ingredients
1 egg
2 Tbsp. water
pinch salt
Dissolve yeast in milk, let stand 5 minutes. Mix together all wet ingredients. Sift together all dry ingredients except salt. Add wet ingredients to dry all at once. Once all are combined, stir in salt. Knead 5 to 8 minutes, until smooth, and passes the window pane test. Place in a lightly oiled bowl. Cover, let rise until double in size, approximately 45 minutes. Punch down, divide into 2 ounce pieces. Cover, let rest 10 minutes. Shape as desired, place on parchment covered cookie sheets. Cover, let rise until doubled in size. Brush with egg wash, bake in a 375 F oven until golden brown, approximately 15 - 20 minutes.
Happy eating!
Thursday, February 21, 2013
Culinary Class: Poultry Processing
In this week's culinary class, we learned how to reduce a chicken into its component parts. A really useful class. This is definitely a skill I need to practice at. It's not terribly difficult, just a little fiddly here and there, to get the cleanest possible cuts, and not waste any good meat.
We discussed the classification of chickens by age. The youngest, and most tender, broiler/fryers. Next are roasters. Last are stewing hens. Honestly, I haven't seen a stewing hen in a supermarket for decades. I remember seeing them as a kid. Then there are capons, which are castrated roosters. Capons tend to be very large.
We discussed the classification of chickens by age. The youngest, and most tender, broiler/fryers. Next are roasters. Last are stewing hens. Honestly, I haven't seen a stewing hen in a supermarket for decades. I remember seeing them as a kid. Then there are capons, which are castrated roosters. Capons tend to be very large.
Tuesday, February 12, 2013
Tuesday, September 25, 2012
On Recipes
There is something I'd like to touch on that I feel is implicit in my posts, but I'd like to make it explicit. When I put up a recipe, it is intended to be descriptive, not proscriptive. That is, it is meant to document what I did, but not to put limits on what you do with it. So, I may specify certain ingredients, but their use just means it's what I had. Say I specify Persian cucumber, unless I give you good reasons why they are superior for this purpose, just use whatever cucumbers you have. Feel free to substitute, reduce, increase, add, remove, etc. to your hearts desire
Then come leave a comment and tell me what you did, 'cause I'd love to know.
Happy Eating!
Then come leave a comment and tell me what you did, 'cause I'd love to know.
Happy Eating!
Friday, July 27, 2012
Old Bread

It is with good cause, however. When I was first married, the spouse was about to throw out the heels of a loaf of bread (as neither of us likes to eat them), and I told her to save them. She asked, "why?", thinking I was nuts. I answered, what I thought was obvious, "for stuffing". As her mother wasn't much of a cook, she only knew stuffing out of a box. So, for our first thanksgiving, I made the sage dressing the way my mother and grandmother did, and she learned how right I was.

Sweet breads get cut up and stored seperately.
By doing this, I have ready ingredients for stuffing, strata, bread pudding, meatloaf, or breading. It is frugal, using something otherwise thrown away.
Happy eating!
Subscribe to:
Posts (Atom)